Mirror Muse AI Video: Make the Selfie Feel Real
Make a Mirror Muse AI video from one clear outfit photo. Learn when to add extra views, what to check in the reflection and how to add sound.
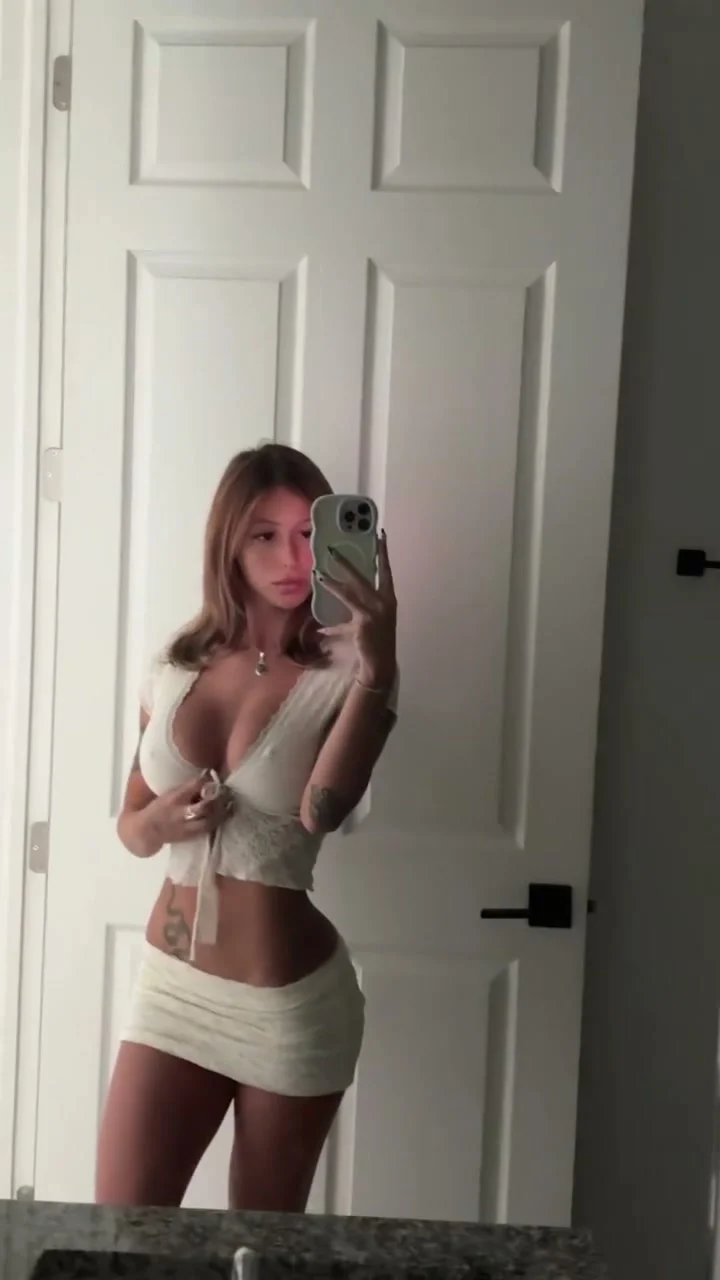
A woman holds up her phone in a bathroom mirror, shifts her pose and touches her hair. Mirror Muse turns a photo of one person into that short mirror-selfie video. Upload a clear face-and-outfit image first; optional photos should show that same person, not friends joining the shot. The template’s reference clip is silent, so plan the sound separately.
Start with the frame viewers will recognize
The Mirror Muse template already has a bathroom mirror, a hand-held phone and a set of small movements. The pose is casual enough that the face and outfit become the point of the edit. If you want people to notice the transformation from your still photo, use a source picture where both are actually visible. A tight headshot might describe your face, but when the mirror composition shows an arm crossing the outfit and a phone held up in front of the body, that headshot doesn’t give the model much information about the clothes below it.
Image 1 is required and sets the person’s appearance. The live form asks for one sharp, well-lit person, ideally shown waist-up or full-body. That is more useful here than a stylish photo taken mostly from behind. You want the final mirror image to look like the person your audience knows, not like a stranger wearing a guessed outfit.
The page lists the clip at about 7.6 seconds, vertical 9:16. It also says the supplied reference has no audio. Silent from the start. That last detail changes how you prepare the post: don’t wait for a built-in beat drop that isn’t there, and don’t time your before-and-after cut to an imagined sound you haven’t selected in the posting app yet. Watch the video first and choose a sound in the app where you’ll publish, using music you’re allowed to use there.
If your goal is a camera move around a person rather than a mirror pose, see the 360° rotation room guide.
Optional photos aren’t extra cast members
You can add two more images, but they are supporting views of the same person. The template’s upload instructions say these extras help describe the face and outfit; they don’t create a second or third character. That distinction saves a disappointing render. Three different people in the photo slots won’t turn a solo mirror pose into a group video.
If you use extras, keep the outfit and hairstyle consistent. A clear front view plus a side view in the same clothes has a job to do. A photo from last winter with a different hair color doesn’t. The more the uploads disagree, the harder it is to tell which look the mirror should keep.
Don’t obsess over a perfect studio portrait. A clean outfit photo near a window may be more useful than an elaborate image where a phone covers half your face. The real test comes later: does the reflection hold together when the hand moves? Check the phone edge, the fingers and the area where hair crosses the cheek. Mirrors give weird mistakes nowhere to hide.
Build a post with a visible reveal
- Open the Mirror Muse page and watch the original silent reference. Note when the hand and head move instead of assuming it’s a static photo with camera shake.
- Upload one clear photo in Image 1. Make the face large enough to recognize, with enough of the outfit in frame to give the edit a consistent look.
- Add zero, one or two supporting views if you have them. Use the same person, preferably in the same clothes. Skip the extras if they’re blurry or contradict the first image.
- Choose 480p or 720p and check the displayed credit cost before generating. Download the finished MP4 and inspect the reflection on a phone at normal speed.
- Pick a track in your posting app if you want music. The template’s source is silent; adding sound is a publishing decision, not a promised part of this render.
For a before-and-after post, show the original still for a moment before the moving mirror shot. Keep the cut close to the first pose so viewers can compare the face and outfit without hunting for them. The video is short. Make that first comparison easy.
Don’t let the caption spoil the mirror
Try one line about the outfit or the mood, not an explanation pasted across the glass. You could even ask which version looks more like a real mirror selfie. Just don’t hide the face beneath a sticker that answers the question for everyone.
YouTube’s Shorts upload guidance accepts vertical videos shorter than three minutes, so the 9:16 export fits its stated file format. If the clip realistically shows someone in a scene they never filmed, review YouTube’s altered-content disclosure guidance or the controls on the platform you use. Ask before using anybody else’s face.
Play the result once with the sound off before choosing a song. If you can recognize the person and the outfit during the head tilt, the visual is ready. If the phone melts into the fingers, change the source photo before you try to edit around it.